Showing posts with label Frames with a Flourish. Show all posts

Sunday, September 12, 2010

Card Making Class

For our second project at this month's Whitminster class I decided to use some of the retiring papers, these are from "Tea Party" and I teamed it with Almost Amythst and Basic Grey cardstock, along with some So Saffron.

We used "Flight of the Butterfly" stamps and a circle frame from "Frames with a Flourish" which is sadly retiring at the end of this month.  Our butterly was stamped with So Saffron and Basic Grey inks then punched out using the co-ordinating Butterfly Punch.  The flowers were cut with ease using the Boho Blossom Punch in Almost Amthyst and So Saffron Cardstock, the Basic Grey centre of the flower is punched with the 1/4" circle punch.

Wednesday, June 2, 2010

Scrapbooking 2nd Layout

One of the other layouts from tonight's Scrapbooking Class.  The DSP is from "Bella Bleu", not all of the papers are "blue" as you may think, they are actually very gorgeous neutral patterns that would suit many occasions.

We used "Circle Circus" for the stamped images, stamped in Not Quite Navy and Chocolate Chip which we layered on top of each other.  We added some Chocolate Chip Striped Ribbon and brads for texture and used a dauber to ink around all the cardstock edges, including the 12x12 DSP base layer.  The frame is from "Frames with a Flourish", stamped over with the leaf and berry stamp from "A Touch of Nature" and then the word "love" from "Basic Phrases" but of course this could be altered to suit your photograph or could just be used as a label for your date.

Saturday, May 22, 2010

May Monthly Card Class

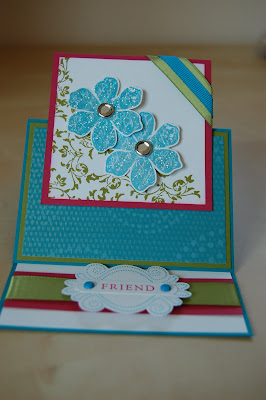
Last month I introduced a Technique which we used on one of our cards and this month's technique was "Heat & Stick Powder" with Dazzling Diamonds.  We stamped our Flower image from "Vintage Vogue" into VersaMark, then straight into our coloured ink (Tempting Turquoise) and stamped onto Very Vanilla cardstock.  Next we dipped it into the Heat & Stick Powder before heating with the heat tool for a short while, without overheating.  The next process was to dip the image into the Dazzling Diamonds and then re-heat for a couple of seconds to set the glitter.  WOW, how gorgeous it looks.

The Easel Card consisted of Tempting Turquoise, Regal Rose and Certainly Celery cardstock along with Very Vanilla for the stamping layers.  I had seen a similar style card but wanted to use some bright and cheery colours and these seemed to work quite well.  We used "Vintage Vogue" for the Flowers and leaves and also "Frames with a Flourish" for the label and "Basic Phrases" for the greeting.

Although at first this card may appear to be complicated, it is actually quite simple to put together and definitely gets the WOW factor!

If you would like to attend one of my classes, or would like any help or information on the products used for this card, just give me a call or email me at stampinkerry@aol.com for further details.

Monday, April 26, 2010

Easel Card


I love making Easel Cards, they are so simple yet have that WOW factor.
For this sample I used the lovely "Vintage Vogue" Flower and Foliage stamps.  My flowers were stamped in "Tempting Turquoise" and I used the Heat & Stick Powder along with the Dazzling Diamonds Glitter to create a wonderful sparkle to them.  I added Rhinestone Brads to the centres to add to the bling!
I stamped the fern image randomly over the Whisper White panel using Old Olive ink and then adhered my sparkly flowers on top.  My greeting was from "Basic Phrases", punched out using the Word Window Punch and then adhered with brads to a stamped image from "Frames with a Flourish" which I stamped and hand cut.  I used some of the new 5/8" Old Olive Satin Ribbon on the top right corner of the card and also on the base underneath the greeting.  The patterned paper is from the new Sweet Pea 12x12" stack.


Saturday, April 24, 2010

Card Making Class - Man Card!

At March's monthly card class I promised everyone that in April's class we would make a "Man Card", so here it is!
We used "Cheers to You", a great set suitable for both male and female cards and celebrations too.

I chose Chocolate Chip, Old Olive and Really Rust which work well together and teamed with Whisper White cardstock.  The middle Beer Jug is hand cut separating the froth part and covering with the new "Frost White" Shimmer Paint then using a dauber on the bottom glass piece to cover in Really Rust, adding a soft layer all over then heavily daubering around the edges with the same colour. Click on the picture to enlarge the image for a closer view.

The greeting was stamped in Really Rust and punched out using the 1" Circle Punch then layered onto a decorative circle from "Frames with a Flourish" then punched out with the 1 3/8" Circle Punch.  The ribbon is the new Old Olive Satin 5/8" from the mini catalogue.

Here is another version where I added some Not Quite Navy.