Saturday, April 30, 2011

April Workshop Make & Take project

Hi stampers, I thought I would share my April workshop Make & Take project with you today, so here it is!

A colour combination of Soft Suede, Baja Breeze and Very Vanilla, gorgeous!

So we all got to play with the Big Shot Machine to die cut our beautiful Butterflies, I pre-cut the "Top Note" Very Vanilla layers to allow more time at the workshop and the card was put together in good time.  We used the "Sanded" background stamp on the Baja Breeze layer which I love, I use this stamp often for all sorts of occasions, it is just so versatile.

We used "Just Believe" to create the background on the Top Note layer and inked the larger foliage/flower stamp with Marker Pens to create a multi-coloured image.  The greeting is also from "Just Believe" available in Wood Mount at £32.95 for 9 gorgeous stamps or Clear Mount for £25.95.  We created the Soft Suede label behind the greeting using the new "Decorative Label" punch and if you would like to see this in action why not book yourself a party and earn some exclusive free Stampin' Up! products at the same time!!

I also have another version of my workshop makes and takes which I will show you shortly.

Wednesday, April 27, 2011

Itty Bitty Bits!!

I love this new set from the Mini Catalogue "Itty Bitty Bits", it is useful for all occasions and the tiny images are perfect for adding a finishing touch to your projects as they are so small!

The great thing about this set is that there are punches that co-ordinate with the stamps and also "Bitty Buttons" too.  The punches are great to use alone and come as a set of three.

My colour combo is Pear Pizzazz, Melon Mambo and Night of Navy, quite striking don't you think?

The ribbon to the bottom of the card is the new "Seam Binding" in Pear Pizzazz, it is just so soft and light and creates beautiful ruffles!  I also used the ribbon to tie a knot around the clip to the left of the card.

My greeting is from one of the new Hostess sets called "Something to Celebrate" which you can find in the Mini.

Sunday, April 24, 2011

Patchwork!

I have been getting so much use out of my new Big Shot Machine, and on this card I used two different Dies and two Embossing Folders.

I had some scraps of "Springtime Vintage" DSP so I punched out random square using the 1 1/4" Square Punch and stuck them onto a piece of Very Vanilla Cardstock.  I ran this through the Big Shot Machine with the "Top Note" Die to create my lovely shaped panel.

I next placed this die cut Top Note into the "Square Lattice" Embossing Folder and ran it through the Big Shot which created this gorgeous piece of textured "Patchwork", it is so pretty in real life, the photo does it no justice!

I die cut the flowers using the Bigz XL die called "Fun Flowers" and ran the Not Quite Navy one through the Big Shot inside the "Vintage Wallpaper" Embossing Folder along with the flower centre.  The effect these Embossing Folders create are just stunning, a very deep embossed finish.

The greeting is from "Cottage Garden" punched out with the new "Decorative Label" Punch.  So not much stamping on this one but a very quick and easy card to put together and very beautiful too!

Friday, April 22, 2011

Final Class Layout

The final layout for April's class using papers from the "Woodland Walk" Designer Series Paper pack.  Quite masculine colours in this range but as you can see I have teamed it with "Vintage Vogue" which is very feminine.  You could of course use a different stamp set which could turn the whole layout into a very "boyish" one!

As you can see, the layout is pretty straight forward and quite clean and simple, of course you can add lots more embellishments at your own leisure.  We complete three 12x12" layouts during our class so it is important that they are clean and simple in order for everyone to go home with completed layouts!  As long as you have the basics on your page, photographs, titles and journalling can come later.

The next class is Tuesday 3rd May, 7.00pm, if you would like to come along please book your space as soon as possible.

I will be running a separate class "Making Gifts and Cards" on the same evening at the same venue, details to follow shortly.

Wednesday, April 20, 2011

Scrapbooking Continued....

Our second layout had colours that would be suitable for masculine or feminine photographs.  I took this photograph of my Husband whilst on a ski-ing trip to France last Christmas.  He is the map reader and always manages to get us back to our Chalet at the end of the day without get lost on the piste!!!

The colours used were Soft Suede, Riding Hood Red, So Saffron and Very Vanilla.  The So Saffron DSP is from the "Play Date" pack and the Soft Suede is from the Neutrals Paper Stack.

The picture is not very good so it is hard to see the detail but we used "Confetti" stamps to create an all over background on the Very Vanilla 12x12" base with Soft Suede ink then we daubed around the edge in the same colour.

We used "Just Perfect" Alphabet Stamps for the second part of our title and punched the letters out using the 3/4" Circle Punch.

Tuesday, April 19, 2011

April Scrapbooking Class Layouts

The first of our three layouts for April's Class "Love".

Our colour combo is Old Olive, Concord Crush, Peach Parfait and Daffodil Delight!  The DSP along the bottom of the layout is from "Greenhouse Garden".

We stamped the background on the Old Olive base using Old Olive ink with the stamp from "Ornate Flowers" then daubed around the whole edge of the page with the same colour.

The border below the DSP was punched using the Eyelet Border Punch then a piece of the Stitched Poly Ribbon in co-ordinating Concord Crush was attached.  We stamped another of the stamps from "Ornate Flowers" and punched it out using the largest Oval Punch then adhered with a Dimensional over the Ribbon border.

The Butterflies were die cut using the Big Shot Machine with the "Beautiful Butterflies" Bigz Die and "Beautiful Wings" Embosslits die.  We ran the largest Daffodil Delight Butterfly through the Big Shot inside the "Manhattan Flower" Embossing Folder to add some texture.

Saturday, April 16, 2011

Clearly Beautiful....

I love this new stamp set from the Mini "Clearly for You", it is just so versatile and the images are so pretty.  There are 12 beautiful stamps in this set available in Wood Mount (£22.95) or Clear Mount (£17.95), great value don't you think!

Onto our card, a colour combo of Riding Hood Red, Early Espresso, River Rock and Whisper White.  The DSP panel at the bottom is from the "Springtime Vintage" pack.  We punched out 1 1/4" squares from Textured Whisper White Cardstock and stamped images from "Clearly for You" in Riding Hood Red layering them equally onto the River Rock layer.  We attached a loop of ribbon behind the Early Espresso layer before adhering to our card base.

The pretty flower was created using the Fancy Flower Punch, then spraying each flower with water and scrunching up, then allowing to dry, giving this very vintage look.  We attached a button tied with Linen Thread to the centre to finish the flower.  The greeting "for you" is also from the "Clearly for You" stamp set.


I really liked this colour combination and the card could be suitable for many occasions.

Thursday, April 14, 2011

Beautiful Butterflies!!

The first card created at this month's card class was this little beauty, and of course, lots of new products from the Mini Catalogue for everyone to play with!

My colour scheme was inspired by the floral paper from "Springtime Vintage" DSP comprising of Not Quite Navy, Crumb Cake and Very Vanilla with a hint of Always Artichoke!
We used the "Beautiful Butterflies" Bigz die to cut our Butterflies and tied them with Linen Thread.  We used the Perfect Polka Dots Embossing Folder on the Not Quite Navy Layer at the top of the card.

The greeting was punched out with the Word Window Punch then layered onto one of the "Four Frames" images which was stamped in Not Quite Navy ink, we punched this out with the new Decorative Label Punch.  To add the layer behind we punched another label in Always Artichoke cardstock and cut it in half and adhered it behind the stamped layer as shown.

The little Baja Breeze flowers along the Satin Ribbon were punched using one of the Bitty Shapes Punches.

All in all, a very feminie card that could suit lots of occasions.

Wednesday, April 13, 2011

One for the boys!

I have to be honest, I prefer making girly cards than ones for the boys but there are times when we just have to steer to the masculine side of things and give the pink a back seat!!

For this card I used up all my scrap pieces of "Elegant Soiree" Designer Series Paper and punched them out using the 1 1/4" Square Punch then layered them onto a piece of Marina Mist cardstock which I then adhered to my Soft Suede card base.

I punched stars using the Ex. Large Star Punch, daubed around the edges and wrapped Linen Thread around randomly, I attached a Neutrals Button to the centre of one of them tying a very thin strip of Marina Mist card stock through it.

The Happy Birthday greeting stamp is sadly now retired, it was from "Punch Bunch", one of the Sale-a-bration stamp sets.

Tuesday, April 12, 2011

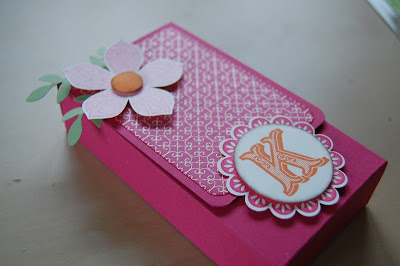
Tissue Pack Box

Another class project, inspired by Elizabeth Shannon who gave me one of these as a gift at the recent Stampin' Up! Regional Training Event at Fareham.  It is a gorgeous little box containing one of the mini packs of tissues, what a beautiful gift to give to a friend.

I have made changes to Elizabeth's original design as she had used the "Business Basics" stamp set which was a requirement for both of our Demonstrations at the Training Event, but I kept the scallop circle at the bottom with my initial as I felt it really personalises the gift.

The papers are from the "Sweet and Sour" Designer Series Paper Pack which have a colour combination of Pumpkin Pie and Rose Red which I teamed with Very Vanilla.

I used the "Kissing Technique" with the "Flower Accent" and "Fine Flourish" stamps and hand cut the flower out, adding leaf stems from the "2 Step Bird Punch".

The Scallop Circle image at the behind the Monogram is from "Perfect Punches", the Monogram hides the Christmas greeting behind it!

If you would like to have a go at making some 3D projects like this one, why not come along to one of my classes and be inspired!  Contact me at stampinkerry@aol.com or 07717 068909 for more details.

Thanks for stopping by

Monday, April 11, 2011

Team Training

On Saturday we travelled to Amanda's Quarterly Team Meeting where over 30 of us got together to learn and be inspired!!  Of course we have lots of fun but also have some business talk too!

As you may know, we create "swaps" and swap with each other so that we come home with lots of inspiration and new ideas, here is my creation.

I used the lovely new Textured Embossing Folder called "Manhattan Flower", it is so simple to create such a beautiful background to your projects.

My stamps were "Four Frames" from the Mini Catalogue P.11 £15.95 Clear Mount or £19.95 Wood Mount and also "Clearly for You" from the Mini Catalogue P.22 £17.95 Clear Mount or £22.95 Wood Mount.

I used a colour combination of Sahara Sand, Perfect Plum, Very Vanilla and the Designer Series Paper is from "Springtime Vintage" which you will find in the Mini on Page 17 priced at £8.75 for 12 sheets of 12x12" Double Sided Paper!

The butterflies were created using one of the Embosslits Dies called "Beautiful Wings" priced at £10.50, which cuts and embosses at the same time.  These little beauties are absolutely gorgeous, so detailed and cute and cut out in no time at all using the Big Shot Machine.

I punched out my frame from "Four Frames" using the new "Decorative Label Punch" from the Mini Page 11, £15.50 and also the Perfect Plum label behind the Amour greeting is created using the same punch. 

The other punches used were the Scallop Trim Corner and Border and of course the Word Window which I used to punch out the "Amour" wording.

I received some lovely swaps in return and will be showing you these soon.

We had a fab day, albeit a long one and thanks go to Jane for driving us there and getting us home in one piece!

Thursday, April 7, 2011

Scallop Envelope Box

I haven't had much "spare" time recently, but in between planning and prepping for classes I spent some time creating samples using a selection of products from the Mini Catalogue.

I created this pretty box with the "Scallope Envelope Die" using the Big Shot Machine.  Now this die is exclusive to Stampin' Up! and there are endless projects waiting to be created using it, so remember, it's not just for envelopes!!

I used a colour combo of Soft Suede, Rose Red, Pretty in Pink and Very Vanilla.  I attached a strip of the gorgeous "Sprintime Vintage" DSP around my box and tied some Pretty in Pink Satin Ribbon around finishing with a bow.

I crimped strips of Rose Red and Soft Suede cardstock to put inside my box under which you could hide a nice surprise for someone!

My Butterfly was created using the "Beautiful Butterflies" Bigz Die which I embossed with the "Perfect Polka Dots" Embossing Folder then using the "Beautiful Wings" Embosslits die I cut out the Vanilla Butterfly and attached it to the Soft Suede one.  I added a couple of co-ordinating buttons and finished with a Linen Thread bow.

If you would like to have a go at making one of these gorgeous boxes, keep your eyes out for a Class coming up next month!

Monday, April 4, 2011

Build A Blossom

Afternoon everyone, looking a little grey out there now, hope it doesn't rain!!

Another card today using products from the Mini Catalogue, in this case a gorgeous new stamp set called "Build A Blossom" which has a co-ordinating Punch, woo hoooo I hear you say, yes, I love how the punches work with the stamps too, it saves sooooo much time......

So "Build a Blossom" is a 2 Step Stampin' Set that requires the use of the Stamp-a-ma-jig although you can use these stamps to build flowers without it.  Firstly I stamped a Pretty in Pink flower base then added the second stage over the top in Rose Red ink, it is hard to see from the picture as the base of the flower almost looks white.  The "leaves" are not actually the leaves from the set, these are flower petal stamps but I liked them as leaves!!  Now if you are liking this set, it is available in Wood £24.95 or Clear Mount £19.95 and the co-ordinating "Blossom Petals Punch" is £15.50.

The Marina Mist layer has been embossed using the "Manhattan Flower" Textured Embossing Folder, now you can't really see from the picture but these Embossing Folders create a very stong embossed image, they are beautiful.  The Embossing Folders are all priced at £6.95 and will give you endless possibilities for your cards and projects turning an ordinary piece of cardstock into something special.  I have used my Spritzer Tool on this layer to add to the effect.

Now that isn't a new label punch, well not really anyway!!  Its the new "Decorative Label Punch" and I have trimmed down the original punch out by positioning it back in the punch and punching it a second time!

I have a busy week of classes but will try to get back to you soon with some more "Mini" creations!


Friday, April 1, 2011

The Mini Catalogue is here.........

at long last, full of some fantastic new products that you are just going to love including the new Big Shot Die Cutting Machine and Exclusive Stampin' Up! Dies and Embossing Folders that are going to take your crafting to another level, enabling you to cut multiple shapes in one go at the turn of a handle!!

I will be launching the new Catalogue at all of my classes this week so be sure to book your space to come along and play with the new products and try out the Big Shot.

If you click on the Catalogue Cover to the right of the page you can view the online version of the Mini, what are you waiting for, go for it!!!

The catalogue is full of gorgeous new stamp sets with co-ordinating punches, beautiful Designer Series Papers with matching new Ribbons and buttons.  There is also a new range of A La Carte stamps too along with a couple of new Hostess sets which are gorgeous!!

If you would like to see the Big Shot in motion, why not call me today to book a party in the comfort of your own home and have the opportunity of earning yourself some wonderful exclusive Stampin' Up! products for free!

So before I go, a quick peak at some of the products in their full glory.  This was a swap card that I made for a recent team training event.


My colour combo is Soft Suede, Rose Red and Very Vanilla, this was inspired by the new Springtime Vintage Designer Series Paper.
I have used several new products as listed below:

Beautiful Butterflies Bigz Die*
Manhattan Flower Embossing Folder*
Embosslits Die Beautiful Wings*
Decorative Label Punch
Four Frames Stamp Set (works with the above punch)
Springtime Vintage DSP

I have lots more to show you over the next few days so do stop by again,