Wednesday, December 29, 2010

6 Cards Class

More from the 6 Cards for £10 Class held at Alveston, this class is held during the day, between 10.30am-1.00pm.  For the 5th card we used the stamp set "Hopeful Thoughts", I really love the tree image in this set, would suit so many different occasions.

Our colour combo was Night of Navy, Chocolate Chip and Old Olive teamed with Whisper White.

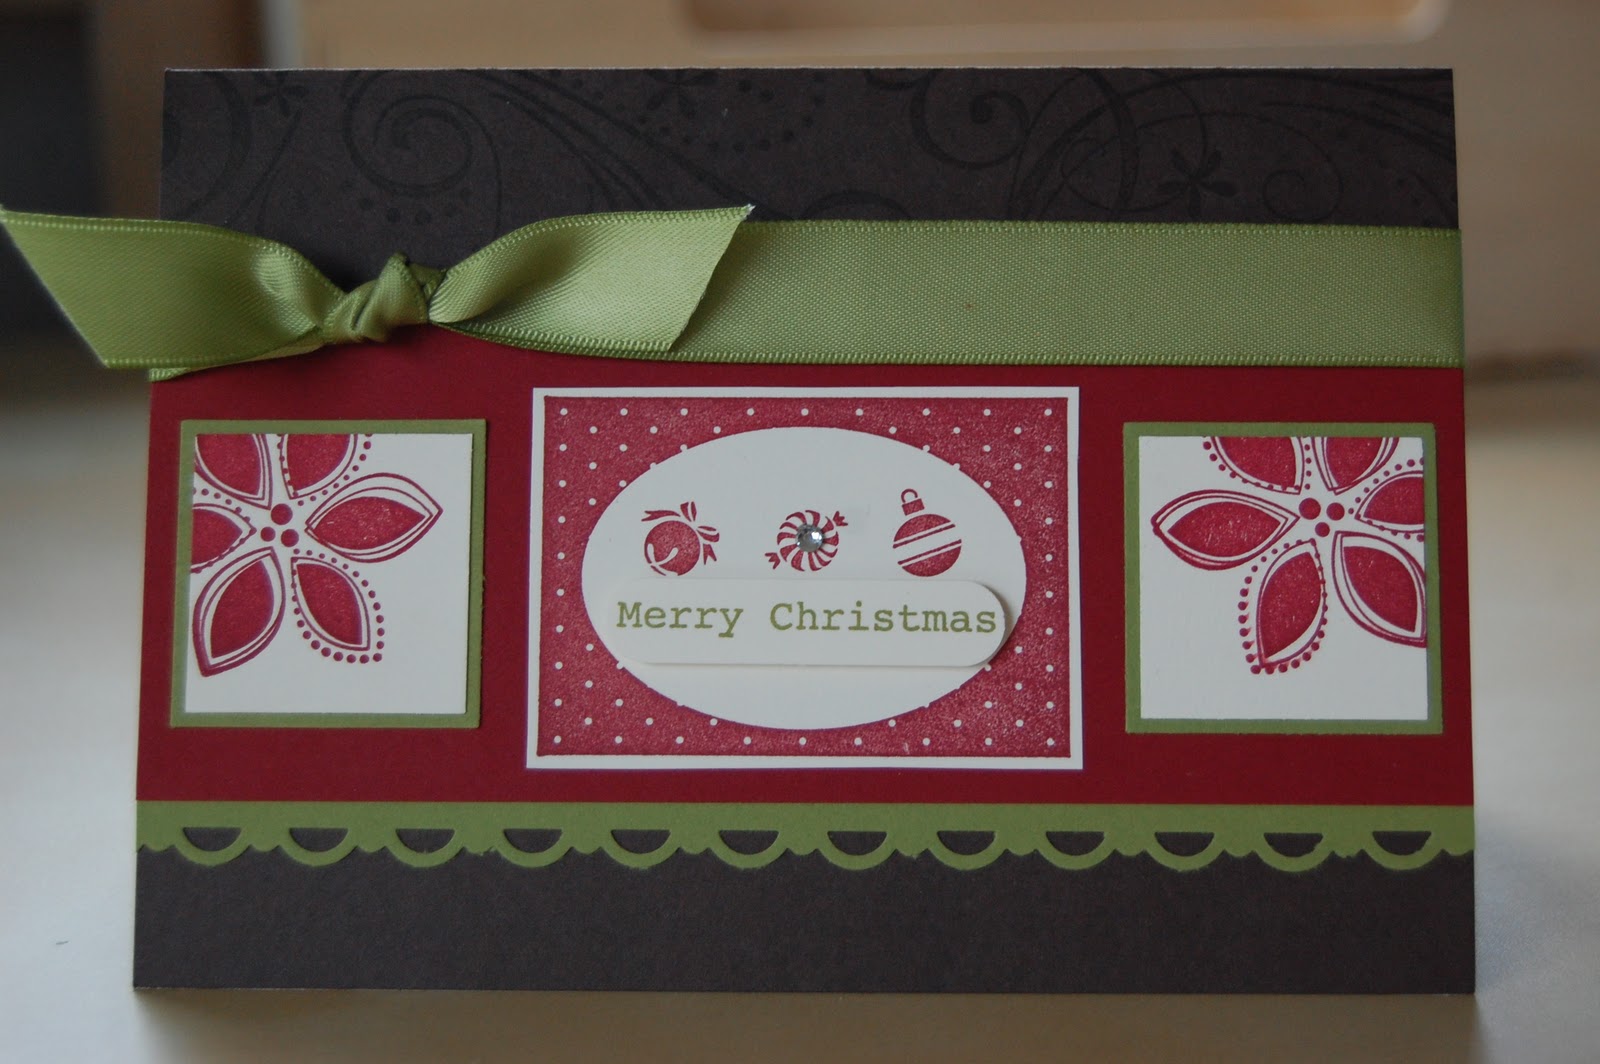
We used the Scallop Trim border punch with Chocolate Chip cardstock to created decorative edges behind the Old Olive layer.  The greeting was punched out using the Modern Label punch, inking around the edges to define.  To finish we added some of the 1/8" Taffeta Ribbon in Certainly Celery which blended well with the colour scheme.

I will be running more 6 Cards Classes at another venue so check back soon for more details.

Saturday, December 25, 2010

Merry Christmas!

Just stopping by from the French Alps to wish you all a Merry Christmas, hope you have all had a good one!

Will be back home very soon to more snow apparently so will catch up with you in a couple of days when my body has recovered from all the ski-ing!

Friday, December 24, 2010

Monday Card Class at Whitminster

At this class we usually make two cards, but as it was Christmas I decided to do something a little different.  I created this Gift Card Holder, we had made something similar at one of Amanda's training days and I loved the idea.

The base colour was Crumb Cake and the first layer was Old Olive cardstock with a piece of the "Jolly Holiday" Designer Series Paper next.  The stamped image is from the set called "Gifted" which is great for all sorts of projects, not just for making tags!  We stamped the image twice punching out the greeting with the Word Window Punch on one of them and layering with a Dimensional.

The pocket to hold the gift card was created by folding an envelope in half and trimming off the top to create two pockets which we punched with the 1" punch to make a slot.  As an extra we made a mini card with the left over pieces of cardstock which could be placed in one of the pockets!  Again we used the "Gifted" set for the Seasons Greetings image.

We attached some 5/8" Satin Ribbon in Old Olive to tie and close the Gift Card Holder.

Wednesday, December 22, 2010

Stylish and Simple

Our fourth card uses "Growing Green" stamps, very delicate images but very beautiful.  Our colour combination is Naturals Ivory and Not Quite Navy.  The images were stamped using Early Espresso Ink.  The greeting is from "Curly Cute" which contains 4 lovely greetings.
Once again a very simple design that is easily replicated and would look so different using alternative images and colours.

Tuesday, December 21, 2010

6 Cards Class

For the third card we made another Christmas design, this is a great sketch which would work with most smaller stamp images that fit inside the squares.
We used the Poinsettia stamp from the "Season of Joy" stamp set with Cherry Cobbler ink onto squares punched with the 1 1/4" Square Punch which we then layered onto Soft Suede 1 3/8" punched squares.  We used the swirly stamp with Crumb Cake ink stamping onto the Crumb Cake card base tp finish.

Monday, December 20, 2010

Second Card

Our second card at the class was created using "Flight of the Butterfly".  The greeting is from the Hostess set "Occasional Quotes", stamped in Rose Red ink.  The Designer Series Paper is from the Subtles Stack and we added a strip of Pretty in Pink cardstock punched with the Scallop Border Punch at the bottom.  To finish we added two basic Rhinestones to the DSP layer.

A really sweet but simple card that could easily be adapted to suit any occasion just by changing the colour and stamped image.

Sunday, December 19, 2010

6 Cards Class at Alveston

At this class we create 6 cards that are simple yet adorable and easily duplicated.  Here is the first card we created at November's Class, held at the Methodist Church at Alveston.

For this Christmas card we used the "So Swirly" wheel to create the image on the Always Artichoke base and then "Contempo Christmas" for the "bauble" and "Merry Christmas" greeting.  The Designer Series Paper is from one of the Simply Scrappin' Kits.

Each card is prepared as a kit so you can swiftly stamp your images and assemble in no time and after the 2 1/2 hour class you will go away with 6 beautiful cards that will fill you with inspiration!

Saturday, December 18, 2010

How cute is this....

I stumbled across these little guys recently on the ILWS forum, they were created by Amanda who gave them as swaps at Convention this year.  I decided to test them out on my ladies at the Class earlier this week and just like me, they all thought they were cute too and loved the After Eight Mints contained inside them!!! 

As you can see it has been created using some of the Stampin' Up! punches, such a clever idea, I wish I had thought of it!!
Thank you ladies for a great evening of fun, laughter and creativity!

Friday, December 17, 2010

A little Gift

I always like to give a little gift to one of the guests at a home workshop and this was what I had created for Lucy's.  I used the "Two-step Bird Punch" to create the Christmas Robbin using the colours Crumb Cake and Cherry Cobbler, I stamped his wing using one of the beautiful decorative flourish stamps from the "Tiny Tags" set.  The "merry" greeting is also from "Tiny Tags", punched out with the co-ordinating Medium Jewelery Tag Punch.  My gift bag base was Crumb Cake cardstock and onto this I used stamps from the "Serene Snowflakes" with Kraft Whisper White ink which is gorgeous.  To finish I tied Gold Elastic cord at the top in a bow.

If you are thinking of booking a Stampin' Up!, give me a call for more information on how you can earn yourself some lovely free products by having an evening of fun with your friends and colleages!

Tuesday, December 14, 2010

Gifted

We made this card at Lucy's workshop recently using the stamp sets "Gifted" and "Season of Joy".  Our colour combo was Early Espresso, Cherry Cobbler and Old Olive, very Christmassy and I love these colours together.  We stamped our centre image using one of the stamps from "Gifted" in Cherry Cobbler Ink then again in Old Olive.  From the Old Olive image we punched out the "Merry Christmas" greeting and layered on the Cherry Cobbler image using Dimensionals.  We added a Basic Rhinestone to the centre of the card to add some sparkle!  We used the 1 1/4" and 1 3/8" square punches to punch and layer the Poinsettia image from "Season of Joy".  

It is tempting to think that the "Gifted" set is only for making Gift Tags as each image typically looks like a tag, but there would be endless creations and projects that could be created with this set of 5 stamps.

Monday, December 13, 2010

Getting there...

Well I finally finished my first batch of Christmas Cards, phew but still have more to make!!  It is surprising how much time is spent putting everything together but I am pleased with the results, quite contemporary but I like them, hope you do too!!

For this design I used "Playful Pieces", a Level 3 Hostess Set which is just so cute, so many different elements to this set, the possibilities are endless!
For the other design I used the Poinsettia stamp from the "Season of Joy" set.  For both cards I used a Soft Suede card base and stamped snowflakes from the "Serene Snowflakes" set in Soft Suede and Kraft Whisper White inks.  I used Cherry Cobbler on the Poinsettia Card and Riding Hood Red on the Present one.


Friday, December 10, 2010

Extra Class - Note Card Carrier - 14th December

My last class before Christmas is the "Note Card Carrier" held on Tuesday 14th December, 7.00pm at Whitminster Village Hall in the lounge.  A gorgeous little carrier by Jenny Moors which I have assembled using two different stamp sets so that you can choose which you would like to create.  Your choices are "Love You Much", very girly and pink and "Just Believe which is more soft and subtle!

Some of you have already confirmed that you are coming, but if you would like to come, please confirm by Sunday at the latest along with your choice of project as there are two to choose from.  Here are the pictures of both projects:

"Love you Much" Class
and the "Just Believe" Class, both would make a lovely gift

All you need to bring is your favourite adhesives to include Sticky Strip (double sided tape), Dimensionals (3D Foam Pads) and your own mug, I will supply the rest!  Email me at stampinkerry@aol.com to book your space or call/text me on 07717 068909.

Wednesday, December 8, 2010

Christmas Cards.....

I am running a little behind with my Christmas cards, well they are half ready, just waiting to be assembled.  I made myself a vow to make Christmas cards regularly throughout the year this year, but it just never happened, I managed to make 4 in January and that was as far as I got!  Maybe I will run a monthly Christmas Card Class where we make a stack of cards each time then come Christmas there is no rush as they are already done!!  Watch this space for more details!

So here are my cards in preparation for assembly, I will need to make more batches but little by little and I will probably change the design and colour combo for the next ones!

I have used Soft Suede, Cherry Cobbler and Baja Breeze teamed with Very Vanilla, how yummy!!  I included some of the gorgeous "Jolly Holiday" Designer Series Paper which is a favourite of mine at the moment.  I used the stamp sets "Season of Joy" for the Poinsettia, "Serene Snowflakes" for the card base background and "Tiny Tags" for that cute little "merry" greeting.

Stop by again to see the finished result!!

Sunday, December 5, 2010

Party this way!

It was my nephew's birthday yesterday and here is the card that I made for him.

My colour combo is Soft Suede, Baja Breeze and Very Vanilla.  I used the set "Party this Way" which I got at Convention this year, this was one of the sets that was inside my exclusive Stampin' Up! satchel! 

The patterned papers are from "Elegant Soiree" Designer Series Paper pack.

I was inspired for this card by a make and take that we completed at Convention, by using the "Party this Way" arrow from the set and making it "spin" using a brad.  I added some of the 1 1/4" Striped Grosgrain tying in a knot to finish.

If you would like to see these products in action, get on the phone or drop me an email today to book your own workshop, invite your friends around and sit back and enjoy demonstrations and a make and take.  How better to see products than to see them in action and try them out before you buy and learn how versatile they can be, you won't get that sort of attention at your local craft shop!  To top it all you can earn yourself exclusive stamps and free merchandise from the catalogue, what more could you want!


Friday, December 3, 2010

Making Gifts & Cards Class

I have a couple of things to show you from some recent classes and this was something we made at Alveston at the end of November.  At this class we make a card and a 3D project.

This month I decided to do a 3D card and chose the Triangle Fold design for this cute little Christmas card.  The stamps are from "Season of Joy" and we inked it up in Cherry Cobbler.  Our colour combo was Soft Suede, Cherry Cobbler and Baja Breeze and we used some of the "Jolly Holiday" Designer Series Paper.  The ribbon is the gorgeous 1 1/4" Striped Grosgrain, tied with linen thread through a Designer Button from the Neutrals range.

Once you remove the belly band, this is what the card looks like inside:

Ah, so sweet, I just love this colour combo too!

Thursday, December 2, 2010

More from the Extravganza

Sorry for not posting earlier, its been a busy week so far!  Back to the Extravaganza!

We created a further two projects in the afternoon, a "Tag Bag" and a "Flip Album".

For the "Tag Bag" we used the stamp set "Just Believe" and constructed our bag and tags using Baja Breeze, Soft Suede and Very Vanilla Cardstock.  We also included some of the "Elegant Soiree" Designer Series Paper which fits in with this colour scheme.  We created one bag to hold 6 tags, 2 of each design.

"Just Believe" includes 9 stamps , 4 of these are greetings and the other 5 are gorgeous foliage and label stamps.  All of our images were stamped in Soft Suede ink.  We punched out the flower circle image and layered with the Scallop Circle Punch in co-ordinating colours and also used the Word Window Punch with the "just for you" greeting.  We used Gold Elastic Cord to tie on each tag.  These look so pretty in real life, the colours are just so delicious!