Sunday, July 31, 2011

Inspiration Station

At Amanda's recent Quarterly Training Event I was responsible for one of the "Inspiration Stations".  This is where we have a "show and tell" table highlighting a particular stamp set or technique.  I chose "Clearly for You" stamps which are available in Clear and Wood Mount, they are just so pretty and I also showed everyone the "Cracked Glass" technique.

Here are some of my samples that I took along, this first card has been distressed, using the Spritzer, distressing kit with some Whisper white daubing to finish:


My samples were all co-ordinating in Soft Suede, Baja Breeze, Crumb Cake and Very Vanilla.

I also used papers from the Elegant Soiree Designer Series Paper range, I will really miss this when it retires in September.

Back with more Inspiration Station projects tomorrow.


Saturday, July 30, 2011

Save the Date.....

THIS POST WILL REMAIN AT THE TOP OF MY BLOG UNTIL 31ST JULY, PLEASE SCROLL DOWN FOR MORE RECENT POSTS!

3rd September 2011
Christmas Extravaganza!

An all day event packed with creativity. 
Spaces will be limited, more details to follow very soon.

Wednesday, July 27, 2011

Stamp Out Cancer Class

Last week I held my "Stamp Out Cancer" class at Whitminster and this is what we created.

Everyone had their own "Strength & Hope" stamp set included with their class so speedily whipped through their projects in no time!

We made two cards and a shallow Top Note box.


Our colour combo is Pretty in Pink, Rose Red, Baja Breeze and Crumb Cake, teamed with Very Vanilla.

We created a shallow version of the Top Note box that we made at the Owl Class

Once again the Spritzer Tool got lots of use!

This card design is taken from the Mini Catalogue, so pretty don't you think?  We used one of the flower stamps from the "Tiny Tags" stamp set with Whisper White Kraft Ink in the corners to add some delicate detail.

A close up of the tag on the card

We had a lovely evening of chatting and crafting in support of a very good cause.

Now I know there are a few of you who were unable to make this class and have requested a re-run so I will try to re-schedule another date for you and post details here on my blog.


Tuesday, July 26, 2011

Clearly For You

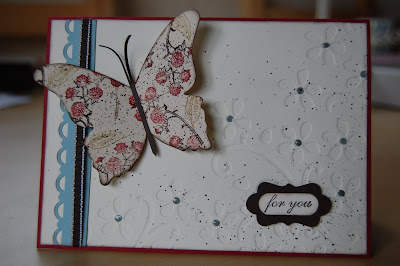
Again using the gorgeous "Clearly for You" stamp set we created this card at July's "Making Gifts and Cards" Class.

The butterfly was die cut using the Big Shot Machine with the "Beautiful Butterflies" Bigz die which get sooooo much use, I mean, who doesn't like butterflies!

Using marker pens we inked up the "blackberry" stamp from the set using Cherry Cobbler, Pear Pizzazz and Early Espresso and stamped onto the Butterfly then once finished we daubed around the edge in Early Espresso and used the same colour to add some "spritz" with the Spritzer Tool which I seem to be using a lot recently!

We embossed the Very Vanilla layer using the "Elegant Bouquet" Textured Embossing Folder then Spritzed with Early Espresso.  The greeting "for you" is also from the same stamp set and punched it out with the Word Window Punch, trimming one of the ends of by putting it back into the punch for a second time.  We also did this with the Espresso layer behind, this time using the new Decorative Label Punch.  We added a mix of Crystal Effects with some Baja Breeze re-inker to the centres of the flowers to finish.

~~~oOo~~~

Supplies used:
Stamps: Clearly For You (Mini Cat. Page 22)
Ink: Early Espresso
Marker Pens: Cherry Cobbler, Pear Pizzazz & Early Espresso
Cardstock: Cherry Cobbler, Early Espresso, Very Vanilla, Baja Breeze
Big Shot: Beautiful Butterflies Bigz Die, Elegant Bouquet Embossing Folder
Tools: Decorative Label Punch, Word Window Punch, Scallop Trim Border Punchm Spritzer Tool
Accessories: Crystal Effects, Re-inkers, 1/8" Taffeta Ribbon

Saturday, July 23, 2011

Making Gifts and Cards Class

The Gable Box, perfect size that will find an endless amount of different gifts or sweet treats as it is quite large.

A colour I haven't used for a while, Cherry Cobbler and it is definitely one of my favourites and here I have teamed it with Baja Breeze and Early Espresso.

The stamps used were from the set "Clearly For You" from the Mini Catalogue which you can find on Page 22 priced at £17.95 for Clear Mount or £22.95 for Wood Mount, such a gorgeous set which I have been using a lot recently.

We also used the "Very Vintage" jumbo wheel on the Very Vanilla panel, inked with Crumb Cake ink.


We used the pretty little butterfly stamp with Whisper White Kraft ink on the base of the box, it stands out perfectly again the darkness of the Cherry Cobbler cardstock.  Our 3D flower is made using the 5 Petal Flower Punch and the tiny flower in the centre is punched out using one of the Bitty Punches, secured in place with a Crumb Cake brad from the Neutrals pot.

We created our handles using the medium sized Oval which is the 1 3/4" x 7/8" and tied a piece of Early Espresso 1 1/4" Striped Ribbon in a knot. 


Wednesday, July 20, 2011

6 Cards for £10

I hold my "6 Cards for £10" Class on the first Wednesday of the month at Alveston Methodist Church.  These are the cards we created earlier this month. 

I try to include a selection of masculine, feminine, young and old so that there is something for everyone!


The cards are all pretty basic and easy to duplicate, much less advanced than my usual 2 card classes and if you place an order from the Catalogue for £20 you get your class for free!

If you would like more information on the different classes that I run, please don't hesitate to contact me.

Tuesday, July 19, 2011

Final Class Layout

Our final layout of the class, one for the boys this time with a bit more of a masculine touch!
Our colour combo is Wild Wasabi, Chocolate Chip, Crumb Cake and Night of Navy.  The Designer Series Paper is from "Woodland Walk" and has a masculine feel to it with lovely woodgrain designs.

Quite a lot going on in this layout, punching, stamping, die cutting and I still have a little journalling and dating to finish mine off.

We used the "Timeless Type" Sizzlits Alphabet with the Big Shot Machine for part of the Title along with "Just Perfect" stamps for the second part.  We also die cut out title panel which is the Top Note Die, cutting around the perferated edge on the Very Vanilla layer and stamping with the "Sanded" background stamp which I use so often.

We stamped circle images from "Circle Circus" and punched out with corresponding circle punches.

Friday, July 15, 2011

Scrapbooking

For this layout we used the "Blueberry Crisp" papers, this pack co-ordinates with the stamp set "Razzle Dazzle".  You will need to double click on the photo for a larger image to see the stamping details as they are difficult to see from this view.

Our colour combo is Pacific Point, Sahara Sand, Basic Black and Very Vanilla.  We used stamps from the "Tiny Tags" and "Notably Ornate" sets and also did a little spritzing with the Spritzer which I love!  We used a strip of stripy Sahara Sand paper which is from the Neutrals Patterns Stack, these paper pads just go on for ever!

The title was die cut using the "Timeless Type" Sizzlits Alphabet which we cut out using the Big Shot Machine.  We also used the Top Note, Swirls and Scribbles and one of the Tags dies. 

We used a decorative Brad from the Hodgepodge Hardware Kit with some Paper Daisies which are really pretty used alone, but great for stamping on too!

~~~

Off to Fareham bright and early in the morning for Amanda's Quarterly Training so will hopefully have some lovely things to share with you soon.

Will be back with the final scrapbook layout for July's class over the weekend.

Wednesday, July 13, 2011

Scrapbooking

Can't believe where the time is flying by, doesn't seem two minutes ago that I was having my last Scrapbooking class, a whole month has gone so I guess I must just be having the best time being a Stampin' Up! Demonstrator and loving what I do!!

This layout was pretty quick to assemble, not loads of stamping, some spritzing and die cutting along with embossing too.  The papers are from the "Sweet and Sour" DSP pack and there is also a Melon Mambo strip from the Patterns Stack.

The title was stamped using "Broadsheet", one of the Alphabet stamps which I adore, using Pumpkin Pie and Melon Mambo ink.

The butterflies were die cut using the "Beautiful Butterflies" Bigz die with the Big Shot Machine and we added pearls to the centres to finish.

Click on the image for a larger view.  Busy week here but back very soon with the other class layouts.

Saturday, July 9, 2011

Big Shot Class for July

The next "Big Shot Class" is Tuesday 12th July, 7.00pm at Whitminster, I still have spaces available so if you would like to come along please let me know asap.

At this class we create 3 projects, this time we are concentrating on the Scallop Envelope Bigz Die.  We are making two 3D items and a card as you can see in the picture below.


Call me on 07717 068909 / 01452 740532 or email me at stampinkerry@aol.com to book your space.

Friday, July 8, 2011

Stained Glass Butterfly

Our technique for this month's card class was the "Stained Glass" one which you will see on my previous post.

Again our butterfly was die cut using the "Beautiful Butterflies" Bigz Die Item No: 114507 £18.95 which you will find in the Mini Catalogue on Page 7.  We cut the top Butterfly layer from Vellum and the bottom in Whisper White which helps the Stained Glass efffect stand out as the vellum is translucent.

You need to ink up the Vellum Butterfly using VersaMark ink, I have used the "Fine Flourish" mini background stamp, then dip into your black embossing powder and heat using the Heat Tool.  You then colour in the image on the reverse side.  Very pretty and yet so simple!

The greeting is from "Perfect Punches" stamp set, inked in Rich Razzleberry and punched out using the XL Oval Punch then layered onto one of the Sizzlits "Lots of Tags" dies which are also found in the Mini Catalogue on Page 8.


The leafy image behind the Butterfly is from the "Hopeful Thoughts" stamp set which looks beautiful coloured with the marker pens in different colours but as we were already doing lots of pen work we just inked it in co-ordinating Pear Pizzazz.

Tuesday, July 5, 2011

It's a celebration!

A card that I made recently for Michaela who is one of my "Stampin'spiration" team members.  The butterfly, cut from the "Beautiful Butterflies" Bigz Die on the Big Shot Machine is something I have been using this month with a technique called "Stained Glass".  You will be seeing this in action at classes and workshops, it is so pretty and effective, yet simple to achieve.


The "Stained Glass" effect looks much better with a Whisper White layer behind as it shows the technique much more clearly and we have been doing this at recent classes.

If you would like to see a Demonstration of how this beautiful butterfly is created, why not book a party, earn yourself some lovely free Stampin' Up! goodies, learn and be inspired!

Call me on 07717 068909 / 01452 740532 or email me at stampinkerry@aol.com for further information.