Wednesday, August 29, 2012

Long time no see!

Remember this little guy, I haven't inked him up for at least a year bless him!
 
Not the best of pictures, the grim weather makes it difficult to get a good one sometimes.
 
Along with the "Dasher" stamp I used "Curly Cute" for my greeting both stamped in Early Espresso.
 
The background was embossed with the "Stripes" Embossing Folder, love this one, it's so classy and perfect for "man cards"!


We used the Dotted Scallop Ribbon Border Punch to create a frame around the greeting, punched in Pear Pizzazz cardstock to stand out from our Old Olive background.
 
The "Bird Builder" Punch was used for the leaves and the "Boho Blossom Flower" Punch for the Poinsettia, finished with a Silver Brad in the centre.  A simple design but quite elegant.

Tuesday, August 28, 2012

Time is running out.....

..... to get those final things on your Wish List from the Summer Mini Catalogue, this catalogue retires on 31st August so don't miss out.
 
Onto another card, this time using "Mixed Bunch", a real favourite of mine that I have used over and over again, it is just so versatile.
 
A really Clean and Simple card today, very quick and easy to put this one together.  The Mixed Bunch flower was punched out with the Blossom Punch, both of which are in the Summer Mini Catalogue and here I used Real Red from the Brights family of colours. 
 
The greeting is from "Perfect Punches" stamps and I used an Island Indigo Marker Pen to omit the oval that runs around the wording.
 

I used the Simply Scored tool to create a subtle border around the Whisper White layer.
 
So simple, love it!

Christmas Class

My Christmas Classes began in July which seems like ages ago now as we are nearing September!!  We make 10 cards at this class, 2 each of 5 designs and it is proving to be a popular evening so I am guessing everyone is wanting to be ahead of themselves this year, including me!
 
One of the cards at this month's class uses the "Pennant Parade" stamp set, one I haven't used in a while and it is not an obvious Christmas set, more for creating bunting which when turned upside down creates the cutest tree!
 
The stars are also from the same set stamped onto a Circle cut using the Big Shot "Circles #2" die.  This sits perfectly inside the scalloped circle which was die cut using the "Perfect Penants" XL Die with Island Indigo cardstock.
 
 
My colour combo is Pool Party, Island Indigo and Lucky Limeade, these are all In-colours which work so well together. 
 
The Lucky Limeade border was cut using one of the Edgelits with the Big Shot and we used Island Indigo Bakers Twine to wrap around it.
 
The greeting is from another Christmas stamp set called "Contempo Christmas", inked with Early Espresso ink and cut out using the Decorative Label Punch, pierced using the Mat Pack to create a straight even line!

 
More cards from the class to follow in the next few days.

Monday, August 27, 2012

Last few days......

..... to have your own "Reason to Smile".  The stamps will only be available until 31st August so don't delay!!
 
My card today uses the "Reason to Smile" on the background, stamped with the lovely Whisper White ink, it always gives stunning results.
 
The Pear Pizzazz spotty frame is from the "Four Frames" stamp set, punched out using the co-ordinating Decorative Label Punch.
 
The greeting is from the "Curly Cute" stamp set which I use so much, I love the font and of course I am still loving the pleated ribbon, here I used Baja Breeze to match my card base.
 
 
The butterfly was cut using the "Beautiful Wings" Embosslit which cuts and embosses at the same time, so clever and very pretty.


Saturday, August 25, 2012

Another Vienna Layout "Spin the Wheel"

Our second layout at August's Class.  This is a picture of me spinning the wheel in the hospitality suite in Vienna.  Each day during our stay we got to "Spin the Wheel" and pick a prize, it was great!
 
 
I used colours that we will sadly be saying goodbye to, Pear Pizzazz and Blusing Bride, two of the In Colours that will retire at the end of September.
 
We stamped onto Blusing Bride card with the same colour using one of the "Mixed Bunch" flowers then punched out with the co-ordinating Blossom Punch adding centres raised using Dimensionals.
 
The leaves are cut using the "Little Leaves" sizzlit die.

 
The daisies were die cut with the Big Shot using the "Daisies #2" die, here I layer two together and curved the edges down.

Friday, August 24, 2012

Table Gifts

My table gifts for this month's "Make a Card, Make a Difference" Class were these cute little boxes created using the "Scallop Square" die.
 
Really easy to assemble and you could decorate them with anything, could even write people's names where I have put the "Just for You" and use them as name place settings.
 
 
Love the "Heart of Hearts" Embosslit die, so pretty and versatile and I adorned it with a flower using a Glimmer Brad for the centre.
 
Inside was a choccy treat!

 
The "Just for You" greeting and outline image are from the "Sweet Shoppe" Stamp set which will disappear at the end of this month so if it's something on your wish list you need to get it ordered soon!


Thursday, August 23, 2012

Double Pocket Pouch

This little Double Pocket Pouch is really popular with everyone, it is so simple to create the pouch and can be decorated to suit so many different occasions.
 
As the "Reason to Smile" stamp set is on promotion during this month I thought I would re-create the pouch to match a card that I recently shared with you.
 
 
The patterned papers are from the "Sweet Shop" pack which will sadly be unavailable after August as they are in the Summer Mini Catalogue.
 
The pockets on the Pouch could contain a Mini Notecard and Sweet Treat or gift.  You can even fold it "inside out" so that the pockets are on the inside and then decorate the plain sides.

 
Here are both items together


The "Reason to Smile" stamp set will only be available during August, you can purchase the stamp set or earn it for FREE with a qualifying order.  Just call or email to place your order and have it delivered direct to your door if you are not local to me, I can take payment via Card over the phone.

Tuesday, August 21, 2012

Getting together

Yesterday I met with two of my downline for coffee which was lovely, I am thankful to Stampin' Up! for bringing me together with so many wonderful people.

I meet with my "business builders" regularly and as I don't have a huge team of ladies this suits us well.  We chat about Stampin' Up!, share ideas and get excited about upcoming events.  As a Demonstrator I am able to pre-order products extra early from the soon to be released Seasonal Autumn/Winter Catalogue and when I got home I had a delivery from UPS containing lots of gorgeous new things to play with, it was soooo exciting!

When I meet with my business builders I like to give a little something back so here is what I made for them:


These began their life as an ordinary brown block bottom paper bag and I added Stampin' Up! goodies to transform them.  There are a couple of sneak peaks on here, including the Patterned Paper, Stitched Ribbon and "For You" Banner Stamp.

I can't share with you what I put inside as I am not permitted to show pictures of actual products until they have been released but I included some lovely Designer Papers and Ribbons that will be available in the new Annual Catalogue in October, these were items I was given during my Incentive Trip to Vienna in June.


Love the "Broadsheet" Alphabet stamps, they are just so useful.


Would you like to get your Stampin' Up! goodies before they are relased to the general public? 

Would you like to get a permanent 20% discount plus more on your products?

  Would you like to earn some extra money? 

Do you like getting FREE Stampin' Up! goodies?

If you have answered yes to at least one of the above questions then why not find out about the benefits of being a Demonstrator and joining my team of "Inspirationals", just ask and I will answer any questions you may have.  Just £99 will get you a fully customisable Starter Kit worth £175 to start you on your way.  Call me for an informal no-obligation chat on 07717 068909 / 01452 740532 and now registration couldn't be easier as it can be done online so no paperwork to complete.


Friday, August 17, 2012

Fun Flowers and Framelits at the Big Shot Class

At this month's Big Shot Class we concentrated on using the "Fun Flowers" Die and Framelits Labels Dies.  We create two cards and a 3D item at this class using the Big Shot.

My colour combo is Crumb Cake, Pear Pizzazz (soon to be disappearing!) and Pretty in Pink.

We used the "Apothecary Art" stamp set along with "Oval All".


This little box is really cut and very easy to put together.  We daubed the edges of the lid and spritzed too, it is hard to see from the picture but we also stamped on it.  The greeting is also from "Apothecary Art"


We accented our flowers with the "Antique Brads" which are so delicious and spritzed them in Pretty in Pink too! 


We used the Lace Ribbon Border Punch to decorate the bottom of the card then cut out one of the flowers to use as the centre part of our main flower


A very simple card but quite pretty


Thursday, August 16, 2012

Scrapbooking

These photographs were taken during my Incentive trip to Vienna with Stampin' Up! .  We were out visiting the Palace and walking the grounds with our Tour Guide and we had to pass through is lovely "Arch of Roses".  The light wasn't perfect for a photograph as the sunlight was shining through but it was so lovely, hence my title "Everything Rosey".


The patterned papers are from the "Sweet Shop" pack, the stripey one from the Paper Stack, so vibrant and modern and my Crumb Cake base neutralises everything.


Loving the "Heart of Hearts" Embosslit die, it cuts and embosses in one go and I adorned it with a gorgeous Printed Brad in Island Indigo.


The word "everything" came from the "For Everything" stamp set, I just inked the word I wanted using a marker pen and ommited the rest of the greeting which read "Thanks for everything".  I use my Itty Bitty Punch Pack all the time, the flowers are just so useful and small enough to squeeze in at every opportunity!


I also used the "Printed Petals" stamp set for the two Island Indigo flowers and "Confetti" for the little flowers on my base which I coloured the centres using the White Gel Pen.

Tuesday, August 14, 2012

At Amanda's Quarterly Training events we have "Inspiration Stations" where Demonstrators show us their talents and wow us with inspirational ideas.

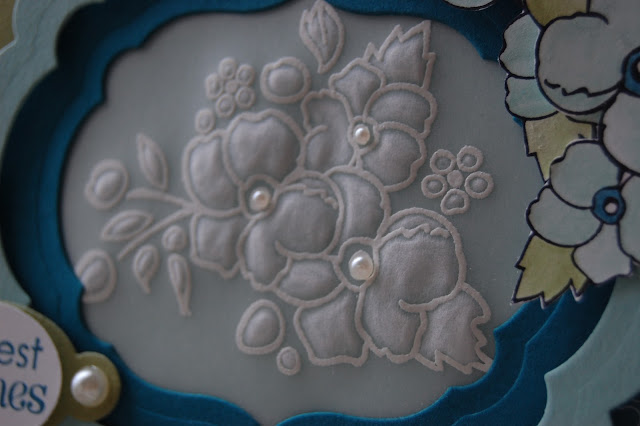
In July, Jane showed us this technique called "Pressed Vellum" and I had seen it before but never tried it so thought I would have a go.

I designed my card to focus on the technique which is achieved by stamping using an outline stamp onto Cardstock Vellum (available in the Catalogue), embossing the image with White Embossing Powder then "colouring in" from behind using the Stylus that is available in the Mini Catalogue, this also comes with the Simply Scored Tool.


I used the "Bordering on Romance" stamp set as it's outlined images are perfect.

The Island Indigo heart DSP is from the "Sweet Shop" paper pack.

The flowers to the top right were coloured in using Blender Pens with the lids of the ink pads, if you squeeze them gently when closed, a residue is left on the lid which you can then "pick up" with a Blender Pen and use to colour.


Lots of use of the Framelits Labels dies and I also created a new label shape using one of the framelits to layer behind my greeting, I haven't seen this done before but I am sure someone has already "invented" it!


The greeting is from the "Petite Pairs" stamp set and this one fits perfectly inside the Small Oval Punch.

Monday, August 13, 2012

Up Up and Away

Sketch blogs are a great way of kick starting your mojo, I use them alot and this is where this card began.  My colour combo is Lucky Limeade, Pacific Point, Pool Party and Whisper White, a great one for the boys.

The spotty paper is from the Brights Paper Stack and you get a whopping 40 sheets of 12x12" papers, 2 each of 2 designs per colour in that family for an amazing £19.50, this stack just goes on and on! 


The stamp set "Up, Up and Away" is from the Summer Mini Catalogue which will be disappearing at the end of this month, I love how versatile this set is for both young and old, male and female cards and projects.

I used the Framelits Labels to die cut the stamped layer and the mat behind it.

A bow tied with Bakers Twine finished it off!

Would you like to own this stamp set to create some masculine cards of your own, why not call/email me to place your order and when you get your delivery through your letterbox you will also receive a copy of the new Autumn/Winter Catalogue to browse at your leisure before it goes live on 1st September.


Friday, August 10, 2012

Vintage card

This is one of the cards we created at last month's card class, using one of my favourite Designer Paper ranges from the current Idea Book & Catalogue "Beau Chateaux".  It has such a vintage feel and I love the colours in the papers, will be sad to see them go at the end of September.

The whole card has a vintage touch, quite a lot of work and not something you would want to be making batches of but great to give to someone special.

We used the "Creative Elemants" stamp set for the Butterfly which was coloured using the Marker Pens and also "French Foliage" on the designer paper layer.


A lovely colour combo of Soft Suede, Marina Mist and Blushing Bride.  Lots of texture with the "Vintage Wallpaper" embossing powder which was also inked with Whisper White Kraft Ink, the spiral flowers and the pleated rosette.


Wednesday, August 8, 2012

Still Smiling!!

Back with another card made using the "Reason to Smile" stamp set that is Stampin' Up!s promotion for August.  You can earn this set for free with a qualifying £60 order or purchase it in wood or clear mount, no minimum spend is required for this option.

So my card uses a colour combo of Sahara Sand, Island Indigo and Pool Party, teamed with Whisper White.

I used stamps from the set to create a subtle background on my base layer.  I used the Framelits Labels to frame my stamped flowers then punched a gorgeous border using the Ribbon Lace border punch.


Both greetings are from the stamp set "For My Family", a very valuable set that I pull out time after time and I die cut a label on the Big Shot to stamp the word "Friend" onto, finishing with a flower punch from the Bitty Punch Pack.

I used Linen Thread to tie a bow on one of the flower stems.


Remember this stamp set is exclusive for the month of August only so if you would like to order yours, just email me or give me a call.  I can take payment via card and can deliver direct to your door, postage at cost.

Saturday, August 4, 2012

Reason to Smile

This stamp set will give you every "Reason to Smile", it is just so delicate and pretty.

Here I have just used the shaddow stamps to create my image so no use of the Stamp-a-ma-jig this time.

My colour combo is Crumb Cake, Blushing Bride and Pear Pizzazz teamed with Whisper White.

I used one of the new Framelits Label dies as a base for my flower image, these dies are just so brilliant, quick and easy to use and create great mats for our stamps as they cut larger sizes than our punches.  I spritzed with a Crumb Cake Marker Pen then daubed around the edge in the same colour.  The background uses another stamp from the same set.


The greeting is from "Petite Pairs", a set I use so much as the greetings are so varied and this one fits lovely inside the Oval Punch.

Remember this stamp set is only available during August and you can purchase it for £14.95 in Clear Mount or £18.95 in Wood or why not earn it for FREE with a £60 purchase.  If you are not local to me and would like to earn this set for free with a qualifying order, I will pay the £4.95 to ship it direct to your door!

Off to Motorcross shortly and have some kits to cut for Monday's class so must dash.

Enjoy your weekend everyone and let's hope for some more sunshine soon!

Wednesday, August 1, 2012

Need a Reason to Smile....

August is here, where did July go??

I have to share with you Stampin' Up's! promotion for August


This gorgeous stamp set is available to purchase throughout August only

Clear Mount £14.95 #130828
Wood Mount £18.95 #130826

but if you place a £60 order you can get the stamp set for FREE


The designs are so beautiful and it is a 2-step stamping set but of course the images can be used alone.  2 Step-stamping is where we layer a fine line image on top of a shadow image which gives amazing results.

Would you like to see this for yourself, then why not book a party and see the 2 Step Stampin' Technique in action!
Back soon with some samples to share.

I am afraid I am still feeling a little dizzy after receiving my paper copy of the upcoming Autumn/Winter Seasonal Catalogue, just can't put it down, I can't share anything with you yet but I know you are going to love the new products.

If you are planning on getting an early start on your Christmas projects this year, why not book a party during September, take advantage of all the new Seasonal products that will be coming your way!